An open graph image (OG image) is the image that is displayed when any of your website links are shared on Facebook, LinkedIn or Twitter. You can provide the public URL of the image in the meta tags of your website and social media website will automatically pick up from there.
<head>
  <title>Digital Inspiration</title>
  <meta property="og:image" content="https://www.labnol.org/og/default.png" />
</head>
Open Graph Images with Puppeteer
Github internally use Google’s Puppeteer library to generate dynamic Open Graph images. The images are generated on the fly by feeding custom HTML into Puppeteer which then generates a screenshot. You can view a sample OG image generated by Github in this tweet.
Vercel, the company behind Next.js, also uses Puppeteer for their open graph image generator. Headless chromium is used to render an HTML page, a screenshot of the page is captured and the file is cached for improved performance.
Create Open Graph Images without Puppeteer
Puppeteer is a wonderful library (I use it internally for screnshot.guru) but it does require some technical know-how to deploy Puppeteer as a cloud function. There’s also cost involved in deploying Puppeteer to the cloud since you’ve to pay for ever request made to the service.
If you are looking for no-code, no-cost, no-puppeteer solution, you can use Google Sheets to generate Open Graph images. That’s what I use to generate dynamic and unique images for every page of my website. You can see a sample OG image in this tweet.
The idea is inspired by Document Studio. You create an image design in Google Slides, replace the placeholder text in the template with the title of your webpage, then generate a screenshot image of the presentation and save it in your Google Drive.
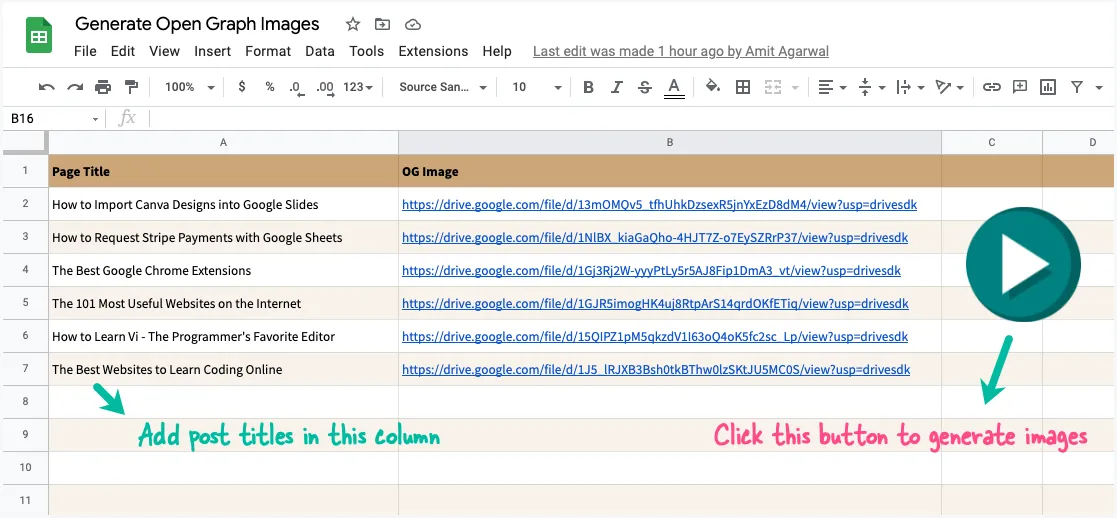
To get started, make a copy of this Google Sheet in your Google Drive. Replace the titles in Column A with the titles of your pages and clear the Image URL column. Click the Play button, authorize the script and you’ll notice that the spreadsheet is immediately updated with the image URLs for each page.
Add more page titles in the Google Sheet, hit the Play button again and the spreadsheet will be updated with image URLs of only the new pages. That’s it.

Test your Open Graph Images
After you’ve added the Open Graph meta tags to your website, you can test your Open Graph images using the tool below.
-
cards-dev.twitter.com/validator - Paste the URL of your website in the URL field and click the
Validatebutton to see if Twitter is able to render the image provided in your Open Graph meta tags. You may also use this validator tool to clear the OG Image from Twitter’s cache for any page. -
developers.facebook.com/tools/debug/ - Paste the URL of your website in the URL field and click the
Debugbutton to see if Facebook is able to render the image provided in your Open Graph meta tags. -
linkedin.com/post-inspector/ - LinkedIn’s Post Inspector tool can help you determine how your web page will appear when shared on the LinkedIn platform. You can also request LinkedIn to re-scrape the page if the associated OG Image has changed.
How Open Graph Image Generator Works?
Inside the Google Sheet, go to the Extensions menu and choose Apps Script to view the source code that is used to generate the Open Graph images. You can also create graphics in Canva using any of the available templates and then import Canva designs in Google Slides.
The app is written in Google Apps Script. It reads the post titles from Google Sheets, generates a copy of the presentation for every row in the sheet, generates a screenshot of the slide and adds it to your Google Drive.
const FOLDER = 'Open Graph Images';
const TEMPLATE_ID = '1QZ4mR6B36XEVyzJf-s8vq88SDnSRPiRDchJ71VM-cfU';

const APP = {
  /* Create a folder in Google Drive for storing open graph images */
  getFolder() {
    if (typeof this.folder === 'undefined') {
      const folders = DriveApp.getFoldersByName(FOLDER);
      this.folder = folders.hasNext() ? folders.next() : DriveApp.createFolder(FOLDER);
    }
    return this.folder;
  },

  /* Download the Slide thumbnail URL and save it to Google Drive */
  getImageUrl(contentUrl, title) {
    const blob = UrlFetchApp.fetch(contentUrl).getBlob();
    const file = this.folder.createFile(blob);
    file.setName(title);
    return file.getUrl();
  },

  /* Make a temporary copy of the Google Slides template  */
  getTemplate(title) {
    const slideTemplate = DriveApp.getFileById(TEMPLATE_ID);
    const slideCopy = slideTemplate.makeCopy(title, this.getFolder());
    return slideCopy.getId();
  },

  /* Get the thumbnail URL of the Google Slides template */
  getThumbnailUrl(presentationId) {
    const { slides: [{ objectId }] = {} } = Slides.Presentations.get(presentationId, {
      fields: 'slides/objectId'
    });

    const data = Slides.Presentations.Pages.getThumbnail(presentationId, objectId);
    return data.contentUrl;
  },

  /* Replace the placeholder text with the title of the web page */
  createImage(title) {
    const presentationId = this.getTemplate(title);
    Slides.Presentations.batchUpdate(
      {
        requests: [
          {
            replaceAllText: {
              containsText: { matchCase: false, text: '{{Title}}' },
              replaceText: title
            }
          }
        ]
      },
      presentationId
    );
    const contentUrl = this.getThumbnailUrl(presentationId);
    const imageUrl = this.getImageUrl(contentUrl, title);
    /* Trash the presentation copy after the image is downloaded */
    DriveApp.getFileById(presentationId).setTrashed(true);
    return imageUrl;
  },

  /* Show job progress to the user */
  toast(title) {
    SpreadsheetApp.getActiveSpreadsheet().toast('✔️ ' + title);
  },

  run() {
    const sheet = SpreadsheetApp.getActiveSheet();
    sheet
      .getDataRange()
      .getDisplayValues()
      .forEach(([title, url], index) => {
        /* Only process rows that have a title */
        if (title && !/^http/.test(url) && index > 0) {
          const imageUrl = this.createImage(title);
          sheet.getRange(index + 1, 2).setValue(imageUrl);
          this.toast(title);
        }
      });
  }
};