Let’s build a simple web application that uses Google OAuth 2.0 to access Google APIs. The user can sign-in with their Google account and authorize the application to access their Google Drive or any other Google service.
When the user signs in, Google redirects the user to the Google OAuth 2.0 authorization page. The user is asked to grant access to the application. The application then exchanges the authorization code for an access token and a refresh token. The access token will expire after an hour but the refresh token will be valid indefinitely (unless manually revoked by the user).
We’ll thus store the refresh token in Cloud Firestore, and use it to generate a new access token whenever the application needs to access Google APIs on behalf of the user.
We are not using Google Sign-in with Firebase Authentication since it does not provide the refresh token that is required to run background API tasks unattended.
Step 1: Create the Google OAuth 2.0 Client
Create a new OAuth 2.0 client inside your Google Cloud project as described in this step by step guide.
Inside your Google Cloud Console, go the APIs & Services section, click on Credentials and click on Create credentials > OAuth Client Id to create a new client ID.
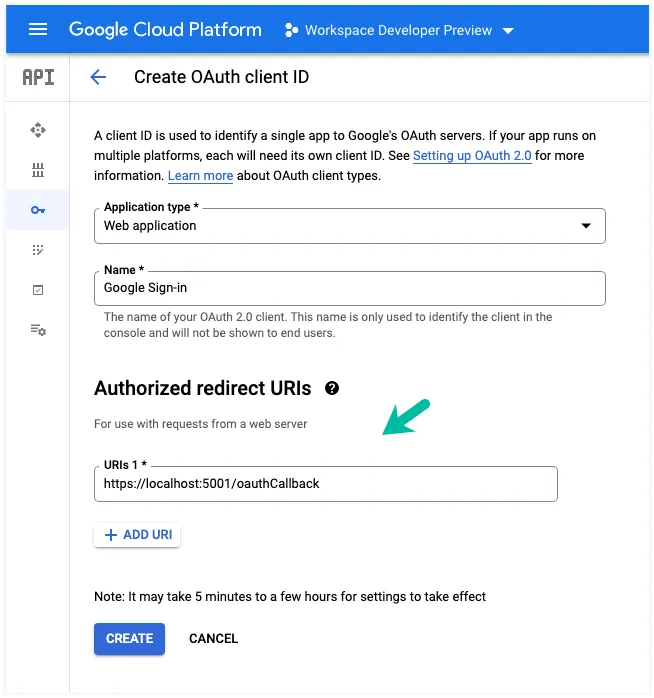
During development, you can put https://localhost:5001/oauthCallback as the redirect URI since the Firebase emulator, by default, will run the web application locally on port 5001.
Make a note of the Client ID and Client Secret provided by Google.
Step 2: Initialize Firebase Function
Open your terminal, create a new project directory and initialize the Firebase project.
$ mkdir oauth2-application
$ cd oauth2-application
$ npx firebase init functions
$ npm install googleapis
You may choose the Use an existing Firebase project option and then select your Google Cloud project with the function. Switch to the functions directory.
Step 3. Initialize Firebase Environment Variables
Create a new .env file and add the following environment variables:
CLIENT_ID=<your client ID>
CLIENT_SECRET=<your client secret>
REDIRECT_URI=<your redirect URI>
Step 4. Generate Authorization URL
We’ll create a function that generates an authorization URL for the user to sign-in with their Google account. In addition to the drive scope, our application also requests for the userinfo.email scope to get the user’s email address.
const functions = require('firebase-functions');
const { google } = require('googleapis');

exports.googleLogin = functions.https.onRequest((request, response) => {
  const SCOPES = [
    'https://www.googleapis.com/auth/userinfo.email',
    'https://www.googleapis.com/auth/drive.metadata.readonly'
  ];
  const oAuth2Client = new google.auth.OAuth2(
    process.env.CLIENT_ID,
    process.env.CLIENT_SECRET,
    process.env.REDIRECT_URI
  );
  const authUrl = oAuth2Client.generateAuthUrl({
    access_type: 'offline',
    scope: SCOPES,
    prompt: 'consent',
    login_hint: request.query.email_address || ''
  });
  response.set('Cache-Control', 'private, max-age=0, s-maxage=0');
  response.redirect(authUrl);
});
We set the access_type to offline to get a refresh token. The consent is set to prompt to force the user to consent to the application. We also set the login_hint to the email address of the user if they are logged into multiple Google accounts.
Step 5. Store the Refresh Token
Once the user signs in, Google redirects the user to the redirect URI. The redirect URI contains the authorization code that we need to exchange for an access token and refresh token for storing in the database.
const functions = require('firebase-functions');
const { firestore as adminFirestore } = require('firebase-admin');
const { google } = require('googleapis');
admin.initializeApp();
exports.oAuthCallback = functions.https.onRequest(async (request, response) => {
const { query: { error, code } = {} } = request;
// User may deny access to the application.
if (error) {
response.status(500).send(error);
return;
}
const oAuth2Client = new google.auth.OAuth2(
process.env.CLIENT_ID,
process.env.CLIENT_SECRET,
process.env.REDIRECT_URI
);
// Exchange the authorization code for an access token.
const { tokens } = await oAuth2Client.getToken(code);
oAuth2Client.setCredentials(tokens);
const oauth2 = google.oauth2({
auth: oAuth2Client,
version: 'v2',
});
// Get the user's email address and Google user ID
const { data } = await oauth2.userinfo.get();
const { id, email } = data;
const { refresh_token } = tokens;
// Store the refresh token in the Firestore database.
// Set merge: true to not overwrite any other data in the same document
const firestore = adminFirestore();
const usersCollection = firestore.collection('users');
await usersCollection.doc(id).set({ id, email, refresh_token }, { merge: true });
response.set('Cache-Control', 'private, max-age=0, s-maxage=0');
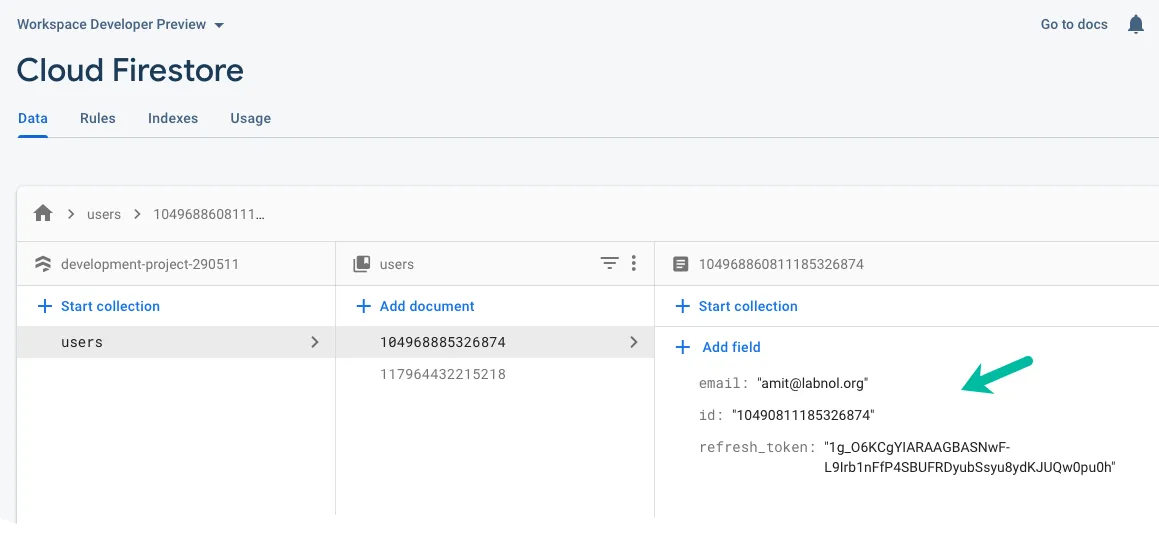
response.send(`User ${email} is authorized! ${id}`);
});Here’s how the documents are stored in the Firestore NoSQL database:
Step 6: Access Google APIs
Now that we have the refresh token, we can use it to generate a new access token and access the Google APIs. In our example, the drive function will return the 5 most recent files from Google Drive of the authorized user.
const functions = require('firebase-functions');
const admin = require('firebase-admin');
const { google } = require('googleapis');

admin.initializeApp();

exports.drive = functions.https.onRequest(async (request, response) => {
  const { user_id = '' } = request.query;
  const user = await admin.firestore().collection('users').doc(user_id).get();
  if (!user.exists) {
    response.status(404).send(`User ${user_id} not found`);
    return;
  }

  const { refresh_token } = user.data();
  const oAuth2Client = new google.auth.OAuth2(
    process.env.CLIENT_ID,
    process.env.CLIENT_SECRET,
    process.env.REDIRECT_URI
  );
  oAuth2Client.setCredentials({ refresh_token });

  const googleDrive = google.drive({ version: 'v3', auth: oAuth2Client });
  const { data: { files = [] } = {} } = await googleDrive.files.list({
    pageSize: 5,
    fields: 'files(id, name)'
  });

  response.status(200).send({ files });
});
Step 7: Create a Firebase Cloud Function
You can run the following command to test the functions locally:
firebase emulators:start --only functionsWhen you are ready to deploy the functions to your Firebase project, you can run the following command:
firebase deploy --only functions