In a previous tutorial, we used a service account to connect to the Google Drive API from a Node.js application. We cannot use a service account to impersonate a Gmail account, but we can use the GMail API with Node.js and Nodemailer to send emails from a user’s own Gmail or Google Workspace account.
You may however use external services, such as Amazon’s SES or Twilio’s SendGrid, to send emails from a service account.
In this tutorial, we will describe how to send emails from a Gmail account using the GMail API and a Node.js application. Please note that Gmail imposes a sending limit of 2,000 messages per day with a total limit of 10,000 recipients per day. The email quota is reset at midnight Pacific time automatically.
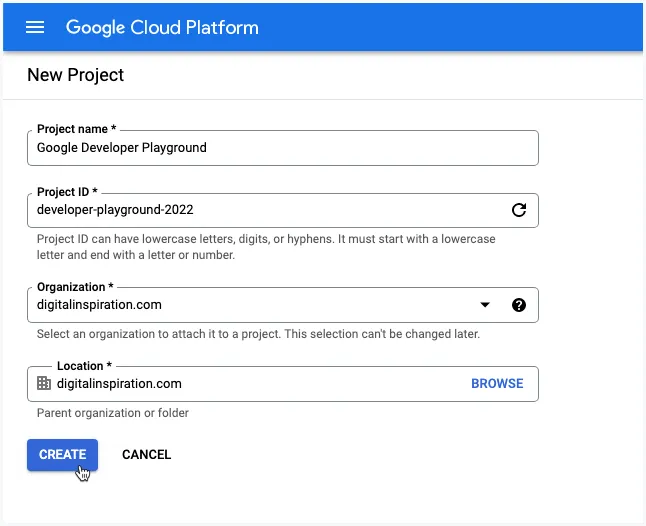
1. Create a Google Cloud Project
Go to cloud.google.com and create a new Google Cloud project. Give your project a name, change the project ID and click the Create button.
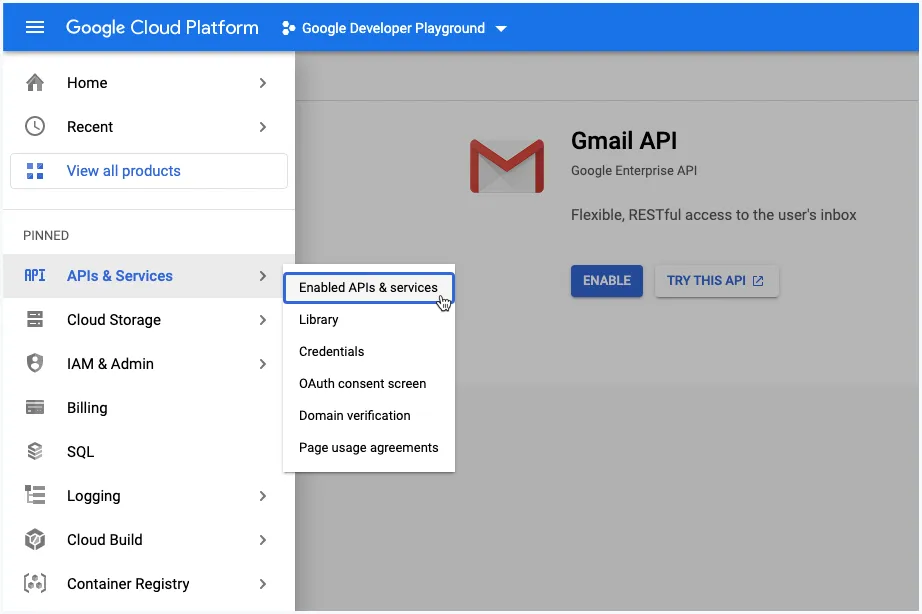
2. Enable Google APIs
Choose APIs & Services from the left menu and click on Enable APIs and Services to enable the Gmail API. The Gmail API lets you view and manage Gmail mailbox data like threads, messages, and labels.
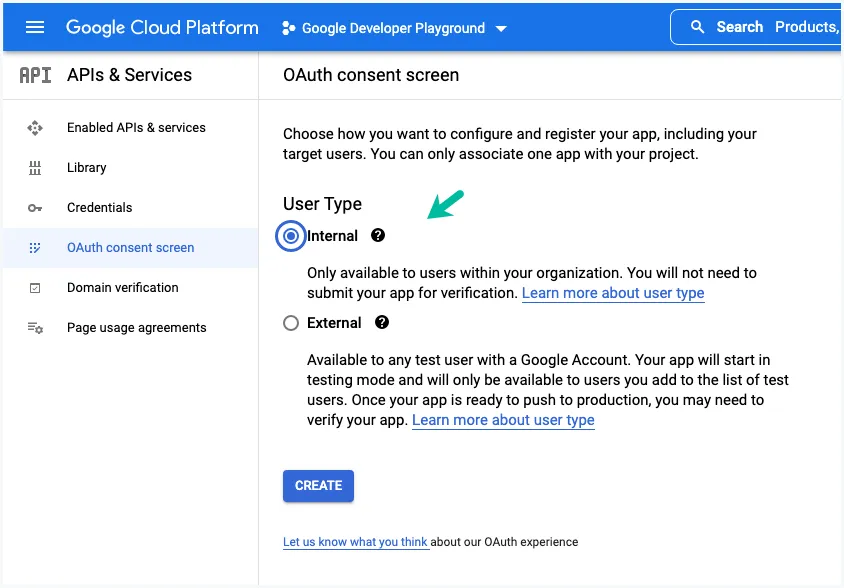
3. Configure OAuth Consent Screen
Under the APIs and Services section, click on OAuth Consent Screen and set the user type as Internal. This will allow the application to access the Gmail API without having to go through the extensive OAuth verification process that can take several weeks. Click on Save and Continue.
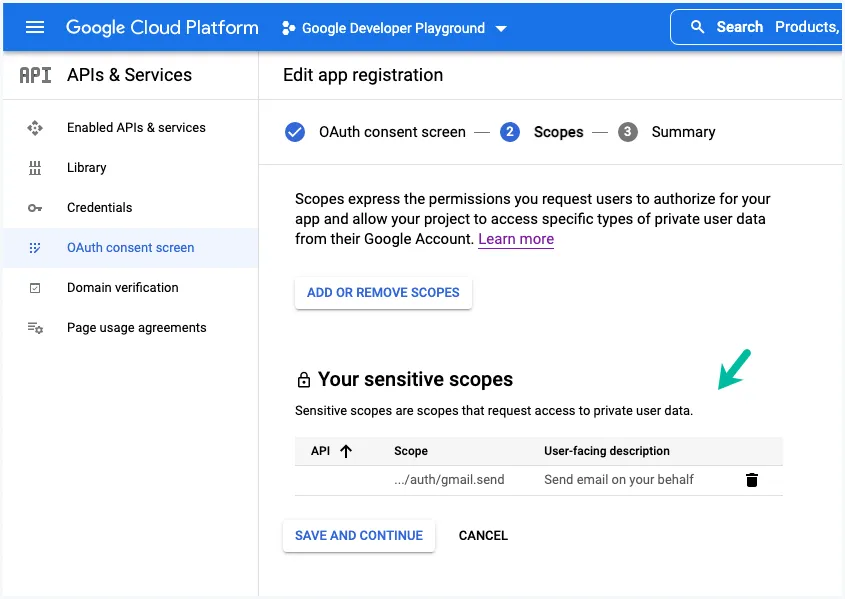
4. OAuth 2.0 Scopes
On the Consent Screen, enter a name for your application and provide your email address where Google may contact you if there are any changes to the consent screen.
On the next screen, you need to provide one or more OAuth 2.0 Scopes for Google APIs. Click the Add Or Remove Scopes button and add https://www.googleapis.com/auth/gmail.send to the list of scopes since we only want to send emails from Gmail and not read any user data. Click Save and Continue.
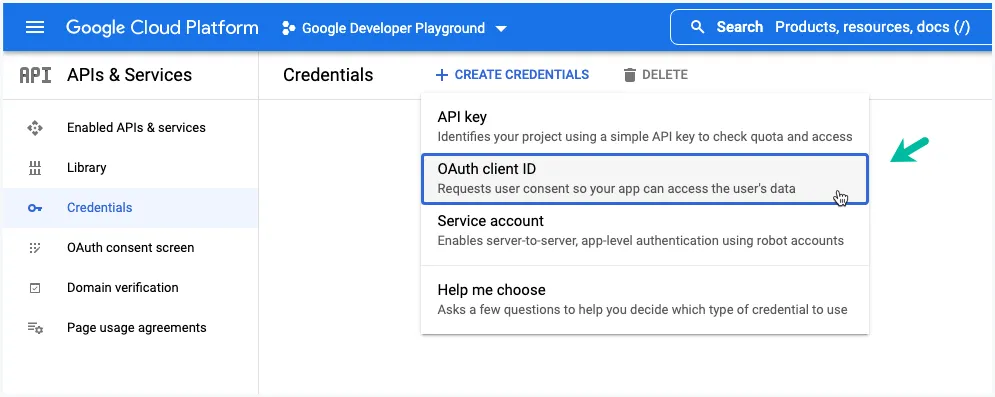
4. Create Gmail OAuth Client
In the APIs & Services section, click on Credentials and click on Create credentials > OAuth Client Id to create a new client ID that will be used to identify your application to Google’s OAuth servers.
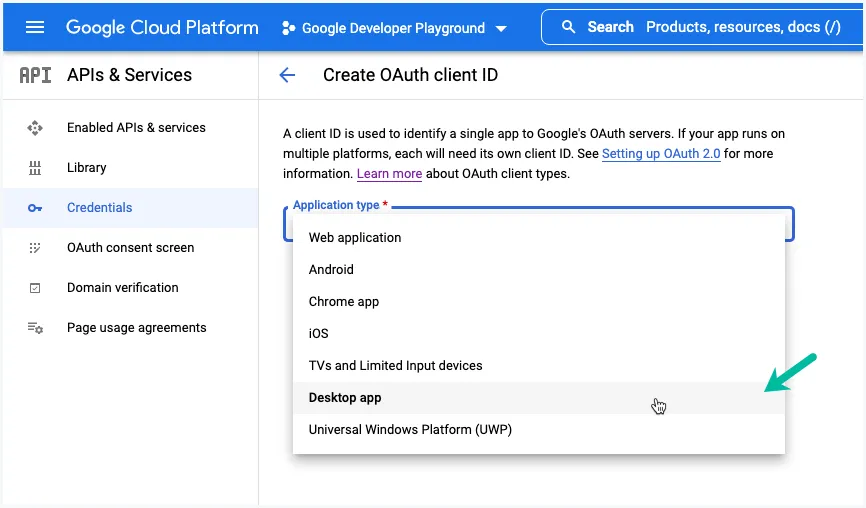
4. Application Type
Set the application type to Desktop App, give your OAuth Client a recognizable name and then click Create to generate the credentials. The name of your OAuth 2.0 client is only used to identify the client in the Google Cloud console and will not be shown to application users.
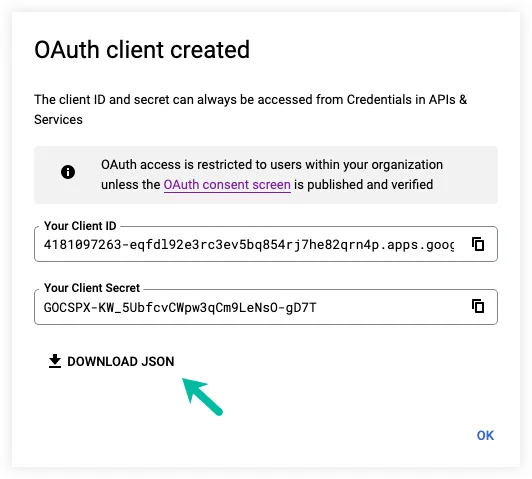
Click the Download JSON button to download the credentials to your computer. It is recommended that you use Node environment variables to store your credentials and not commit this file to your Github repository.
{
  "installed": {
    "client_id": "4181097263-eqfdl92e3r.apps.googleusercontent.com",
    "project_id": "developer-playground",
    "auth_uri": "https://accounts.google.com/o/oauth2/auth",
    "token_uri": "https://oauth2.googleapis.com/token",
    "auth_provider_x509_cert_url": "https://www.googleapis.com/oauth2/v1/certs",
    "client_secret": "GOCSPX-KW_5UbfcvCW9LeNsO-gD7T",
    "redirect_uris": ["http://localhost"]
  }
}
5. Get the authorization code
The OAuth authorization sequence begins when your application redirects the user to a Google URL containing the OAuth Client ID and scopes requested. Google handles the user authentication and return an authorization code, which the application can exchange for an access token and a refresh token.
// auth.js

const { google } = require('googleapis');
const credentials = require('./credentials.json');

const { client_secret, client_id, redirect_uris } = credentials.installed;
const oAuth2Client = new google.auth.OAuth2(client_id, client_secret, redirect_uris[0]);

const GMAIL_SCOPES = ['https://www.googleapis.com/auth/gmail.send'];

const url = oAuth2Client.generateAuthUrl({
  access_type: 'offline',
  prompt: 'consent',
  scope: GMAIL_SCOPES
});

console.log('Authorize this app by visiting this url:', url);
Open your command prompt and run the following command. You will be redirected to the Google authorization page.
$ node auth.js

Authorize this app by visiting this url:

https://accounts.google.com/o/oauth2/v2/auth?access_type=offline&scope=https%3A%2F%2Fwww.googleapis.com%2Fauth%2Fgmail.send&response_type=code&client_id=4181097263-eqfdl92e3r.apps.googleusercontent.com&redirect_uri=http%3A%2F%2Flocalhost
6. Create an Authorized OAuth2 Client
The browser generates an authorization code that you can paste into token.js to generate an access token and a refresh token. The access token will be valid for 1 hour and the application will use the refresh token to obtain a new access token when it expires.
// token.js

const { google } = require('googleapis');
const path = require('path');
const fs = require('fs');
const credentials = require('./credentials.json');

// Replace with the code you received from Google
const code = '4/0AX4XfWjz8e2q81iC9TFzgHCn1tdTmQyMjA';
const { client_secret, client_id, redirect_uris } = credentials.installed;
const oAuth2Client = new google.auth.OAuth2(client_id, client_secret, redirect_uris[0]);

oAuth2Client.getToken(code).then(({ tokens }) => {
  const tokenPath = path.join(__dirname, 'token.json');
  fs.writeFileSync(tokenPath, JSON.stringify(tokens));
  console.log('Access token and refresh token stored to token.json');
});
Run the following command to generate the access token and refresh token.
$ node token.js
Access token and refresh token stored to token.json
This will add a new token.json file to your project directory that contains the access token and refresh token.
{
  "access_token": "ya29.A0ARrdaM_AaAL3mdEpVZshT-cFfpLkxeMOJz_d1Ok",
  "refresh_token": "1//0gdubhqQhx89VVNBR45_4eipxlYc4Nf5A9J67B8M",
  "scope": "https://www.googleapis.com/auth/gmail.send",
  "token_type": "Bearer",
  "expiry_date": 1649574729833
}
7. Email Sender Library
We are using the popular Nodemailer library to generate RFC822 formatted e-mail messages that can be streamed to SMTP. You can also create a Mime message manually but the former is easier to use.
// gmail.js

const { google } = require('googleapis');
const MailComposer = require('nodemailer/lib/mail-composer');
const credentials = require('./credentials.json');
const tokens = require('./tokens.json');

const getGmailService = () => {
  const { client_secret, client_id, redirect_uris } = credentials.installed;
  const oAuth2Client = new google.auth.OAuth2(client_id, client_secret, redirect_uris[0]);
  oAuth2Client.setCredentials(tokens);
  const gmail = google.gmail({ version: 'v1', auth: oAuth2Client });
  return gmail;
};

const encodeMessage = (message) => {
  return Buffer.from(message).toString('base64').replace(/\+/g, '-').replace(/\//g, '_').replace(/=+$/, '');
};

const createMail = async (options) => {
  const mailComposer = new MailComposer(options);
  const message = await mailComposer.compile().build();
  return encodeMessage(message);
};

const sendMail = async (options) => {
  const gmail = getGmailService();
  const rawMessage = await createMail(options);
  const { data: { id } = {} } = await gmail.users.messages.send({
    userId: 'me',
    resource: {
      raw: rawMessage
    }
  });
  return id;
};

module.exports = sendMail;
8. Send Email with Gmail API
This is the last step. Create a mailOptions object that defines the different fields of the message including the sender’s name, recipients, attachments, HTML body and subject. You may also add headers to the message and these are useful for adding message tracking information.
For file attachments, you can directly attach any file from the local file system to the Gmail message or even pull an attachment from a remote URL.
const fs = require('fs');
const path = require('path');
const sendMail = require('./gmail');
const main = async () => {
const fileAttachments = [
{
filename: 'attachment1.txt',
content: 'This is a plain text file sent as an attachment'
},
{
path: path.join(__dirname, './attachment2.txt')
},
{
filename: 'websites.pdf',
path: 'https://www.labnol.org/files/cool-websites.pdf'
},
{
filename: 'image.png',
content: fs.createReadStream(path.join(__dirname, './attach.png'))
}
];
const options = {
to: 'amit@labnol.org',
cc: 'cc1@example.com, cc2@example.com',
replyTo: 'amit@labnol.org',
subject: 'Hello Amit 🚀',
text: 'This email is sent from the command line',
html: `<p>🙋🏻♀️ — This is a <b>test email</b> from <a href="https://digitalinspiration.com">Digital Inspiration</a>.</p>`,
attachments: fileAttachments,
textEncoding: 'base64',
headers: [
{ key: 'X-Application-Developer', value: 'Amit Agarwal' },
{ key: 'X-Application-Version', value: 'v1.0.0.2' }
]
};
const messageId = await sendMail(options);
return messageId;
};
main()
.then((messageId) => console.log('Message sent successfully:', messageId))
.catch((err) => console.error(err));Send Personalized Emails
If you would like to send personalized emails with Gmail and Google Sheets, you can use Mail Merge for Gmail.