Document Studio makes it easy for you to create, print and send documents, presentations, spreadsheets, PDF reports and any other type of documents in 3 easy steps.
Step 1: Add the source data in a Google Sheet. You can also import data from Excel or other programs that export in CSV format.
Step 2: Create a richly formatted template either in Google Docs, Google Sheet or Google Slide. You can add any spreadsheet field (column title) in the template.
Step 3: Run the add-on to begin document merge and your files will be automatically stored in Google Drive. Emails can be sent to multiple recipients and the merged documents are included as an attachment in the email message.
Objective: Send reminder letters to business customers requesting them to pay the pending invoice amount.
Step 1: Create the Document Template with {{ Tags }}
Create new Google document that will be our template. It can be either a document, spreadsheet, or a Google Presentation. You can richly format the template with logo images, tables, headers, section, page breaks, etc. just like any other Google document.
You can include variable merge fields or placeholders inside the document using the curly braces notation. For instance, if you wish to use the First Name and Salutation as variable fields, the text in the template would read something like this:
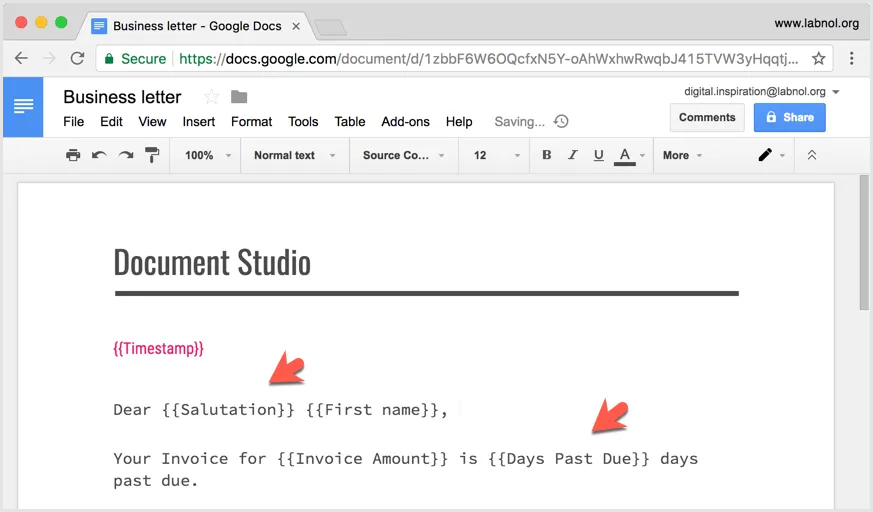
If you are using a Google spreadsheet as the template, you can even include merge tags inside a formula. For instance, =UPPER("{{First Name}}") would capitalize the name in the output merged document.
Step 2 - Import the source data in a Google Sheet
Open a new Google Sheet and add the data. You can copy-paste data from another Google Sheet, import Microsoft Excel files, or export data from your CRM or database in CSV format and import it into the data sheet.
A new document would be generated per row in the spreadsheet. Also, ensure that the column headers in the data source spreadsheet match with the {{merge tags}} that you have used in the document template.
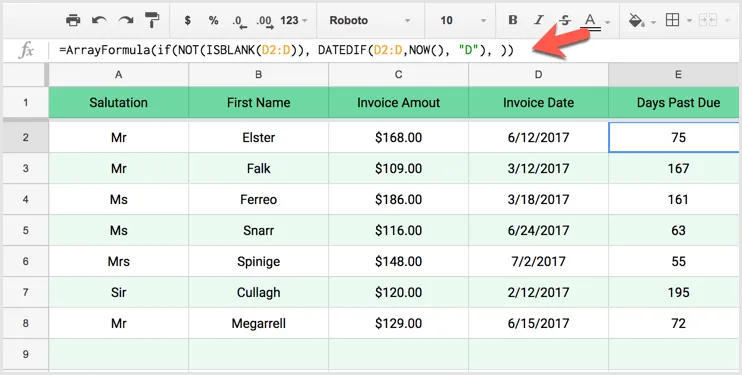
You can also add additional columns with custom formulas like we done for the Days Past Due column. We know the invoice date so we apply the DATEDIF function with an ARRAYFORMULA to calculate the days since when the invoices have been due to the various customers.
Step 3 - Configure Document Studio
Now that our source data is ready, go to the add-ons menu in the Google Sheet, choose Document Studio and open the sidebar.
Go to the Document Merge section and choose the template with the Google File Picker that we created in the first step. Specify the file name of the generated document - you can use {{merge tags}} here as well. The default export format is Adobe PDF but you can other formats to choose from including Microsoft Office and Open Office formats.
Step 4 - Configure Mail Merge with Attachments
While you may be using our standalone Gmail Mail Merge add-on, the advantage with Document Studio is that it supports both mail merge and document merge. So your merged documents can be sent to one or more users as attachments right after the files are generated.
To get started, expand the Mail Merge with Gmail section, toggle the Mail Merge switch and create an email template using the built-in WYSIWYG HTML Mail editor.
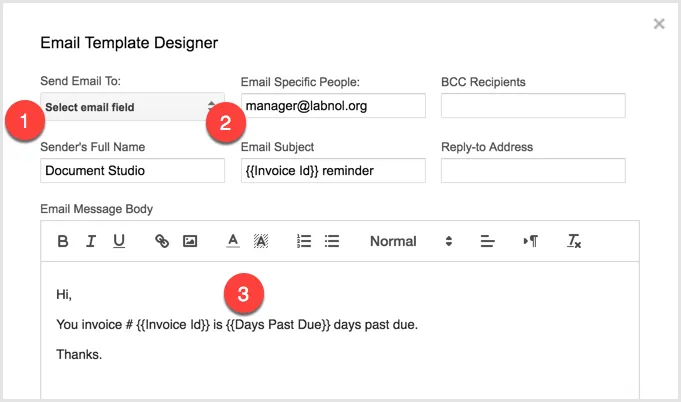
If you have a field in the source data sheet that contains the customer’s email address, you can choose that field in the drop down (#1 above) and the emails will automatically be sent to the customer.
You can include one or more fixed email addresses in the CC and BCC list (#2 above) and separate them with commas. The email subject and message body can include any {{merge}} field.
Step 5 - Configure the Google Drive Folder
Expand the “Upload to Google Drive” section in the Document Studio sidebar and visually select the parent folder where the generated files would be saved.
You can also specify a custom subfolder path with {{merge tags}} so the files are further neatly organized into multiple subfolders. The subfolder path can be specified in the following format:
\\{{Zip Code}}\\{{Customer Name}}Step 6 - Run Document Merge
Our configuration is complete and it is time to run merge and generate the documents.
Open the Save section, check the “Merge Now” option and run merge. You’ll see a nice progress window in the lower right corner indicating the merge progress. The add-on will add a few extra columns to the right of the current sheet that will contain a link to the merged file and whether the email has been sent.
You can also check the “Merge Every Hour” option and save the settings to automatically run merge as new rows are added to the current sheet. This is useful when your data sheet is getting populated by a third-party process or an API, and you would like to create documents with the new rows without having to manually run the process.