Do you find anything similar between the following two images?
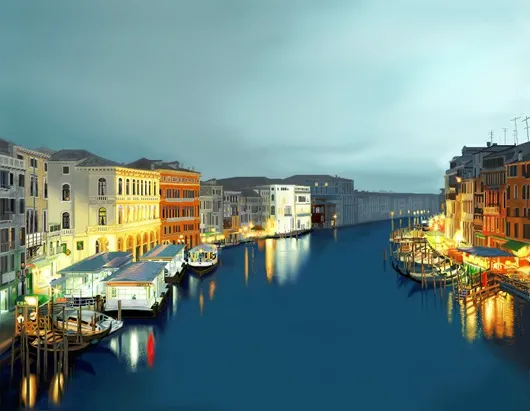
Well, both these images are from the Rialto Bridge in Venice but the one on top was captured using a digital camera while the one below is a drawing done entirely in MS Paint, the free and often neglected image editor that Microsoft has bundled with every edition of Windows since v1.0. Interestingly, MS Paint will be part of Windows 7 as well though with a slightly revamped interface.
Most Windows users think of Paint as a software that should be used only in a pinch when there’s no other alternative. However there are lot of things that go in favor of Paint – it’s light on resources, can open and save popular image formats, has a clean (minimal) and consistent user interface and is almost always present in any Windows installation.
Tips & Tricks for using MS Paint
Here are a couple of Paint features and tips that might just help you take a second look at this old performer.
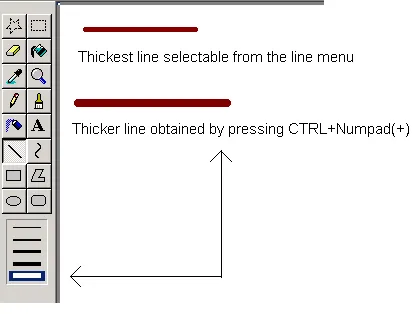
Tip #1 – Increase or Decrease brush size
These are universal shortcuts: CTRL + NumPad (+) increases the size of tip while CTRL + NumPad (-) decreases the size. This shortcut works for the pencil, brush, airbrush and the line drawing tool.
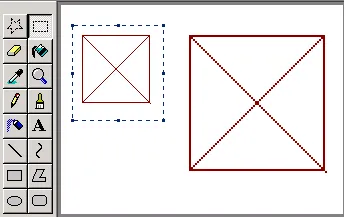
Tip #2 – Changing the Image Size
The above shortcuts (CTRL + & CTRL -) can also be used to resize image selections in Paint without having to drag the selection. Simply use the Select tool in Paint to select an area of the image and then use the CTRL shortcuts to change the size of the selection.
Tip #3 – Use the Eraser as a Color Replacement Tool
Say you have an uneven patch of yellow color on an image that you now want to replace with blue. You could use the Fill bucket command to fill that patch with Blue but since the shape is not uniform, lets use the Eraser tool to only replace the color that we want.

First use the colour picker tool to pick the (foreground) colour that you want to replace (in this case, left-click anywhere that has yellow). Now choose the replacement (background) colour by right-clicking in the color palette. Next, select the eraser tool and wave it across the image while you hold the right-click button.
Tip # 4 – Undo the Last Operation with your Mouse
MS Paint supports 3-level of undos meaning that you can only undo the last 3 changes made to a drawing. You can however undo (or rather cancel) the last operation using the right button of your button.
For instance, if you have selected the freehand tool to draw a line but if the line doesn’t meet your expectation, don’t let go the left button and click the right-button to cancel the last operation. This will save you from using the keystroke CTRL+Z to undo your last stroke and won’t add anything to your undo stack.
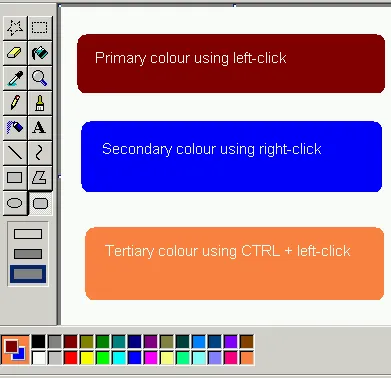
Tip #5 – Use the colour palette to store 3 shades
If you left click on a colour shade, it becomes the primary colour while right-clicking on another colour will make that a secondary colour. There’s however an option to store a third colour in the palette as well.
Just select the “Pick Color” tool and CTRL+ left-click on any one of the shades in the Palette or the canvas window and then CTRL+ left-click to use this new 3rd shade without losing the 2 earlier shades. You can then access this color by holding the Ctrl key while drawing.
And finally, for those still unimpressed by what can be accomplished by MS Paint in the hands of a skilled artist, take a look at this image of Mona Lisa produced entirely within MS Paint.
By Shahrzaad M Parekh.
Find this article at: http://www.labnol.org/software/ms-paint-tips/9305/
Tags: feature, microsoft paint, tips, Software


Reader Comments
You must be a great artist to be able to use this so simple tool :D
Written by Phaoloo on 07.29.09
Wow! Didn’t know 5th tip. Thank you :)
And the artist of this Mona Lisa is freaking crazy!! That was fantastic! o_O
Written by Pattty on 07.29.09
thank you. I really missed the replacement tool from the good old windows 3.11 days. Now I know where it is. :)
Written by Janko on 07.29.09
nice to see someone writing on MSpaint i always use it when i take printscreen its quite light
Written by Nitesh patel on 07.29.09
Just amazing. I never think for power paint brush
Written by kuwar on 07.29.09
Wow, i didn’t know the #5tip, thank you.
I saw a guy painting Mona Lisa, and the other guy painting a spor car on YouTube.
The picture you shared is brilliant.
Written by MaFiAMaX on 07.29.09
Didn’t know 1 and 2.
Somewhere I have the math to use the Skew and Scale tools to create rotated text at any angle.
Written by Keith T. on 07.29.09
Thanks for the MS Paint tips, but pretty sure I couldn’t pull off a picture like that. I thought both were photos when I first viewed (and sometimes still do).
Written by John on 07.29.09
Man, it is awesome. Hope it will bring out the non existent artist me.
Written by Showa on 07.29.09
its really wonderful
Written by ami on 07.29.09
Amazing… I can’t still believe that the second pic of the Rialto Bridge is actually made in MS Paint!!
Written by Neville Chesan on 07.30.09
I’m still pinching myself to see if this could be true. I find it hard to digest that it’s done with the plain old MS Paint.
Even if it holds true this must be done by a person who is really bent on doing this and had a boat load of patience. Think about the undo history of Paint (just the last action can be undone). Even Microsoft has moved on with the age-old Paint and have it enhanced. If you have to do anything decent try Paint.NET instead.
Written by DemoGeek on 07.30.09
You didn’t mention the hidden increase in magnification! Below the 8x magnification selection there is a small space and then the edge of the box. Clicking the edge of the box increases the magnification from 8x to about 10x. It takes some practice to hit it easily, but it’s possible. I don’t know if it’s a glitch or easter egg or what, but it’s present in all forms of Paint for XP.
To show you what I mean, here are two screenshots. The area click is the white line that forms the lower part of the box. This one is at the selected 8x:
link
And then here is what it looks like when you use the hidden increase:
link
It’s a surprisingly unknown easter egg.
Written by Mike on 07.30.09
It’s really amazing to see the video of monalisa painting. Is it a real progressive painting?? or you just manipulated the Monalisa Picture, retrogressively???
Written by wegatalk on 07.30.09
Thanks for the tips. I am not MS Paint literate at all. These made me take a look and find much more than I realized was there and that I could use!
Written by Kat1110 on 07.30.09
I design paper models, one of my first was a lunar module for Fiddlersgreeen paper model website. I did it entirely in MSpaint, afterwards I rescanned it to get a hire DPI than the 96 I was stuck with in paint.
Written by Matt Sparks on 07.30.09
Nice tips. Didn’t agree with what I saw in the video though.
Written by Asish on 07.31.09
Wow, I use Photoshop but use Paint for Function + prt sc (print screen) then paste into Paint to save a copy of my computer screen when I need proof etc. Never would have thought the humble program could produce such a work of art.
Would love to see the 2nd picture from the top reproduced and condensed on YouTube – PLEASE!
Written by annette1212 on 07.31.09
It’s really amazing to see these features of MS Paint which many of us think that are not available in Paint.You are a very good sales person for IT products.Thanks.
Written by Sandeep on 08.01.09
Great…. I knew only the third tip…. None other… very nice.
Written by pramodh on 08.01.09
Simply superb.
Written by krishna on 08.01.09
Well it is really amazing to see that guy painting monalisa i think even Leonardo da Vinci will envy this man !!!
Written by Imran Soudagar on 08.01.09